How To

Outdoor Entertaining Paint Plan: Alfresco Walls, Eaves and Trim for a High-Wear Australian Summer

28/01/2026

An alfresco area is one of the most used zones of an Australian home in summer. It is also one of the hardest to keep looking clean and consistent year-round. Unlike fully exterior walls that are often exposed to uniform sun and rain, alfresco areas sit in a mixed environment: partial shade, partial weather exposure, higher humidity after rain, and a constant load of real-life wear from cooking, entertaining, smoke residue, dust, and frequent touch points.

That combination produces predictable paint problems if you approach alfresco repainting like a normal interior job:

  • Staining and residue build-up around cooking zones
  • Mould spotting in shaded corners where moisture lingers
  • Uneven sheen where walls are wiped or scrubbed regularly
  • Peeling and blistering when surfaces were not fully cleaned or dried
  • Patchiness and lap marks from trying to paint in hot, fast-drying conditions

This guide gives you a practical “paint plan” for an alfresco refresh that stands up to summer use. It is written for homeowners and renovators, but it is also structured so a tradesperson can follow it as a scope.

1) What makes alfresco zones uniquely hard on paint

Alfresco paint performance is mostly about environmental mechanics and cleaning behaviour.

1.1 Mixed exposure creates mixed failure modes

Alfresco areas commonly include:

  • A ceiling (often fibre cement or similar sheeting)
  • Beams, posts, and trim (often timber or primed pine, sometimes metal)
  • Adjacent walls (masonry, render, or cladding)
  • Surfaces that are shaded most of the day, then catch low-angle sun in morning or afternoon

Shaded areas dry slower after rain and can hold moisture longer, particularly if air movement is limited. That increases mould risk and can also slow the curing process after painting.

1.2 High-contact cleaning changes the finish over time

Alfresco walls and posts are often wiped more than interior walls because they pick up grime, smoke residue, and splashback from cooking. Repeated wiping can:

  • Create shinier “cleaned patches” in low sheen or matt finishes if the surface burnishes
  • Leave visible marks if the paint film is still soft when cleaned
  • Expose poor prep, especially where grease or dust was not removed before painting

1.3 The “ceiling problem”: condensation and airflow

Alfresco ceilings often sit in a zone where warm air rises and then meets a cooler surface, especially in the evening or after a summer storm. If the area is enclosed on multiple sides, airflow is reduced, and humidity can remain high. This is a classic recipe for mould spotting if cleaning and ventilation are not managed.

2) Decide the scope first: what are you actually painting?

Before selecting colour, define which surfaces and elements are in scope. Alfresco jobs often fail because the scope is vague and prep gets skipped in “grey areas”.

A clear alfresco scope typically includes:

  • Ceiling
  • Fascia lines and beams
  • Posts and balustrades
  • Adjacent walls
  • Door and window trim in the alfresco zone
  • Optional: feature wall, outdoor kitchen backing, or privacy screen

Now identify the substrate for each surface:

  • Fibre cement sheeting
  • Render or masonry
  • Previously painted timber
  • Bare timber
  • Metal posts or rails
  • Previously stained or oiled timber (higher risk)

This substrate list determines prep and primer requirements.

3) The summer timing plan: paint with shade and humidity, not against it

If you want a consistent finish outdoors in January, timing is not optional.

3.1 Follow the shade line

Avoid painting broad surfaces in direct sun. Direct sun accelerates drying, reduces working time, and increases the risk of lap marks and texture variation. In alfresco areas, the sun may hit edges and corners more than the main wall, which can create visible “dry lines” at transitions if you are not careful.

A simple strategy:

  • Morning: work on surfaces that are fully shaded and dry
  • Midday: focus on ceiling and shaded walls, or pause if the area is heat soaked
  • Afternoon: move to the next shaded section if sun direction changes

3.2 Avoid early morning dew and late-day humidity spikes

Many alfresco areas look dry but hold moisture in shaded corners. If you start too early, you can coat over invisible moisture film. If you paint too late, you can run into rising humidity and slow curing overnight.

Practical schedule:

  • Start mid-morning after surfaces are clearly dry
  • Stop with enough time for the coating to set before evening humidity increases

3.3 Wind and dust control

Wind can deposit dust and debris into wet paint. If your alfresco is near landscaping, construction, or a road, avoid painting on windy days or use temporary screening to reduce contamination.

4) Prep is not optional: it is your adhesion system

Most alfresco repaint failures trace back to contaminants, especially dust, chalking, and cooking residue.

4.1 Wash down properly

A thorough wash down should remove:

  • Cobwebs and insect residue
  • Dust and airborne grime
  • Any chalky residue from older coatings
  • Localised grease or smoke residue near cooking zones

For cooking zones, treat degreasing as a separate step. “Looks clean” is not the same as “bond-ready”.

4.2 Mould and mildew: treat, remove, and reduce recurrence

If mould is visible:

  • Treat it first
  • Remove the residue fully
  • Identify why it is there (shade, water run-off, blocked gutters, limited airflow)
  • Address the cause where possible, even with simple fixes like clearing drainage paths and improving airflow

Painting over mould rarely solves the underlying problem. It usually delays it.

4.3 Scrape, sand, and feather edges

Any flaking paint must be removed to a sound edge. Feather the transition so the new film does not telegraph a hard ridge.

4.4 Seal the weak links: cracks and joints

Alfresco areas often fail at joints and edges:

  • Around posts where water can track down
  • At ceiling to wall joins
  • At timber end grain
  • Around penetrations (lights, fans, wiring)

If water gets behind the coating, peeling risk increases. Address failed sealants and cracks before painting, not after.

4.5 Priming and spot-priming: do not skip it

Primer decisions depend on substrate:

  • Bare timber and repaired timber generally require appropriate priming
  • Bare masonry or chalky surfaces may require sealing
  • Stained areas may require stain blocking before topcoat
  • Unknown coatings or glossy areas often require additional surface profiling and potentially a bonding approach

If you want your scope to be defensible, specify priming as “as required by substrate condition” rather than assuming one rule fits all.

5) Sheen selection for alfresco: where most “nice-looking” jobs go wrong

Sheen is the most overlooked decision in alfresco repainting. It controls appearance, cleanability, and how visible scuffs and wipe marks become.

5.1 Ceiling: keep it forgiving

Alfresco ceilings often show defects because light rakes across them. Many people choose a flatter finish on ceilings because it can hide minor imperfections. The trade-off is that very flat finishes may mark more easily depending on product and cleaning behaviour.

Practical ceiling considerations:

  • Choose a finish that balances defect-hiding with your likely cleaning needs
  • Avoid heavy scrubbing on ceilings in the early cure period
  • Fix ventilation or condensation issues where possible before repainting

5.2 Walls: low sheen is often the practical compromise

For alfresco walls, low sheen tends to be a pragmatic middle ground because:

  • It is generally more forgiving than higher gloss finishes
  • It is typically easier to clean than very flat finishes
  • It can look consistent across broad areas

5.3 Trim and posts: higher durability where hands touch

Posts, railings, and trim are high-contact surfaces. A slightly higher sheen can sometimes be more wipeable and harder wearing. The trade-off is that higher sheen highlights defects, so prep must be better.

If your alfresco has lots of trim and timberwork, consider splitting your spec by zone:

  • Ceiling: ceiling-appropriate finish
  • Walls: low sheen
  • Trim and posts: more durable finish suited to frequent wiping

6) The paint system plan using Wattyl At Home Premium

Your system is more than the topcoat. It is prep, primer where required, then a consistent two-coat finish.

6.1 What to keep consistent

To avoid patchiness and sheen variation:

  • Keep the same product family across the zone where possible
  • Use the same sheen on the same surface type
  • Apply two full coats, not one “thick coat”
  • Maintain consistent application method (roller type, nap, pressure)

6.2 Application controls that matter in summer

To improve finish quality in January:

  • Keep a wet edge on broad surfaces
  • Work in smaller sections rather than racing large walls
  • Avoid over-spreading or “dry rolling”
  • Manage cut-in timing so edges do not fully dry before rolling adjacent areas
  • Rotate around the alfresco with shade rather than forcing a wall in direct sun

6.3 Drying and cure: plan for real-life use

Alfresco areas get used quickly. If you repaint and host a weekend gathering immediately, you increase the chance of scuffing or marking during early cure.

Build a buffer into your timeline:

  • Paint earlier in the week if you want the weekend free
  • Avoid installing fixtures, leaning furniture, or scrubbing the surface too early
  • Keep sprinklers away from freshly painted surfaces

7) Colour planning for alfresco: bright, durable, and low-risk

Alfresco colour selection should be practical:

  • It should work in strong daylight
  • It should reduce visible grime and wear
  • It should match adjacent materials like brick, roof, decking, stone, and outdoor furniture

7.1 A low-risk alfresco palette structure

A simple, scalable plan is:

  • Ceiling: clean white
  • Trim and posts: same white or one-step warmer/cooler white
  • Walls: light neutral or mid-tone that hides day-to-day grime
  • Optional accent: one feature element only (screen, door, feature wall)

If you are choosing whites and off-whites, use Wattyl’s whites palette to shortlist and then test on-site.

7.2 Undertone testing, the step people skip

Two whites can look identical in store and completely different outdoors. Undertones shift with:

  • Time of day
  • Shade
  • Nearby materials like red brick or warm timber decking
  • Warm outdoor lighting at night

Practical testing workflow:

  • Paint large sample areas on the actual surfaces
  • Check morning, midday, late afternoon, and under the alfresco lights at night
  • Check next to fixed features you cannot change (roof colour, decking stain, pavers)

This reduces repaint risk and keeps the project “one and done”.

8) High-wear zones: outdoor kitchens, BBQ splashbacks, and traffic lines

If your alfresco includes a cooking zone, treat it as a higher-risk wall area.

8.1 Grease and smoke residue prep

Grease is a topcoat killer. If grease remains, adhesion risk increases. Your prep must:

  • Degrease, rinse, then allow to fully dry
  • Remove any visible residue, not just odour
  • Sand lightly if required to promote mechanical adhesion on hard surfaces

8.2 Consider zone-based repaint strategy

If one wall takes most of the load, you have two options:

  • Paint all walls the same for consistency, but expect the cooking wall to need more frequent cleaning and touch-up
  • Use the same colour but select a sheen or system approach for the cooking wall that suits more frequent wiping (still within one product family if you want consistency)

9) Maintenance plan: keep it looking new for longer

A good alfresco paint job is partly defined by how it is maintained. 9.1 Wash schedule
  • Light wash-down periodically to remove dust and salt haze
  • Address mould spots early rather than letting them spread
  • Avoid harsh scrubbing where possible and escalate cleaning method gradually
9.2 Reduce moisture traps If you consistently see mould in the same corner:
  • Improve airflow if possible
  • Reduce plant and mulch contact with walls
  • Fix drainage and run-off points
  • Consider how sprinklers are hitting the surfaces
Paint is a protective layer, but it is not a substitute for moisture management.

Alfresco repaint checklist (copy and paste)

Planning

  • Confirm scope: ceiling, walls, trim, posts, feature elements
  • Identify substrates: fibre cement, masonry, timber, metal
  • Choose palette structure: ceiling white, trim white, wall neutral
  • Shortlist whites here: https://wattyl.com.au/shop/colours/?palette=whites

Prep

  • Wash down and remove contaminants
  • Degrease BBQ and cooking zone walls
  • Treat and remove mould where present
  • Scrape and sand loose coatings
  • Feather edges and patch repairs
  • Address cracks, failed sealants, and water entry points
  • Prime and seal where required based on substrate condition

Paint system

  • Use Wattyl At Home Premium
  • Apply two coats for consistent film build and finish
  • Maintain wet edge and work in shade

Aftercare

  • Avoid heavy cleaning in early cure
  • Keep sprinklers off fresh paint
  • Plan a follow-up inspection and touch-up window

FAQ

1) What is the biggest mistake people make painting an alfresco area in summer?

Painting broad surfaces in direct sun and rushing prep. Heat shortens working time, and any dust, chalk, or grease left behind reduces adhesion and finish consistency.

2) Should alfresco ceilings be painted the same as interior ceilings?

Not always. Alfresco ceilings experience different humidity and airflow conditions than indoor ceilings. Choose a system and finish suitable for the environment and the substrate, and address condensation and mould drivers before repainting.

3) How do I stop mould returning on an alfresco ceiling or wall?

Start with cause control: improve airflow, remove moisture traps, fix drainage and run-off, and keep surfaces clean. Paint can help, but mould recurrence is usually driven by ongoing moisture and limited drying.

4) What sheen is best for alfresco walls?

Low sheen is commonly a practical compromise for broad walls because it is forgiving on surface imperfections and typically handles regular wipe-downs better than very flat finishes. Your cleaning habits and exposure conditions should guide the final decision.

5) What sheen is best for posts and trim?

Posts and trim are high-contact surfaces. A more durable, wipeable finish is often preferred there, but higher sheen also highlights defects. Prep quality must match the sheen choice.

6) Can I paint an alfresco wall that is near a BBQ or outdoor kitchen?

Yes, but prep is critical. Degrease thoroughly, rinse, and ensure the surface is dry before painting. Ongoing cleaning should be done carefully to avoid uneven sheen or burnishing.

7) How do I avoid lap marks in an alfresco repaint?

Work in shade, keep a wet edge, and paint in manageable sections. Avoid over-spreading the roller and do not let cut-in edges fully dry before rolling adjacent areas.

8) How long should I wait before hosting or cleaning after painting?

Build buffer time into your schedule. Even if the surface feels dry, the coating can still be developing hardness. Avoid aggressive wiping and heavy contact early, particularly in high-wear areas.

9) What product range should I use for this alfresco plan?

This paint plan is built around Wattyl At Home Premium.

10) Where can I browse Wattyl inspiration content for colour and outdoor styling?

Inspirations: https://wattyl.com.au/category/inspirations/
Articles: https://wattyl.com.au/category/articles/

Articles you may also like

News 28/01/2026
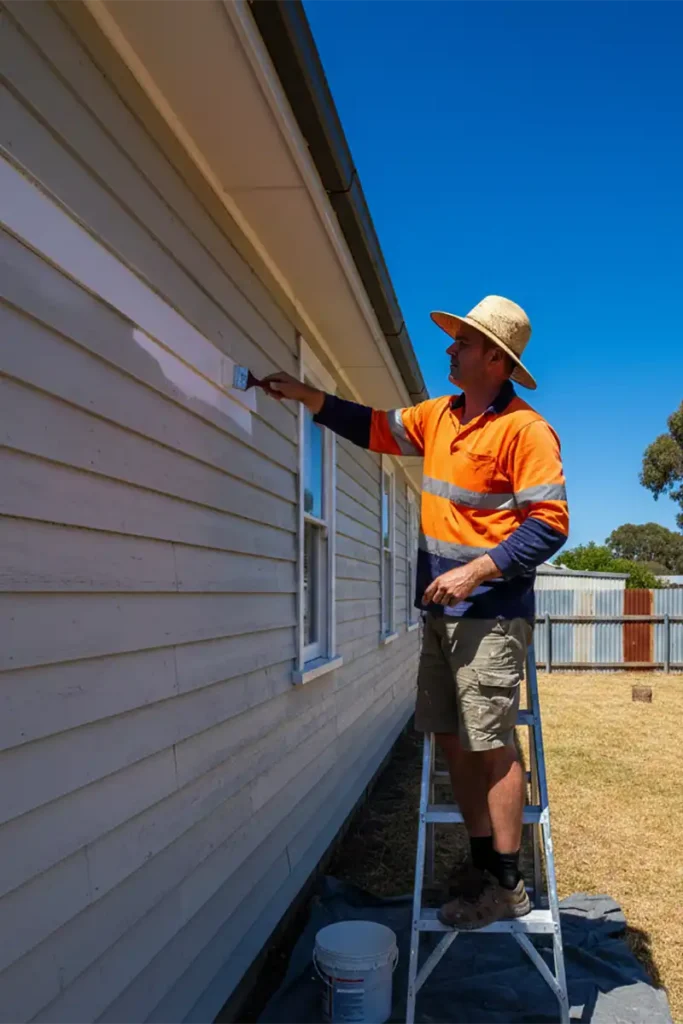
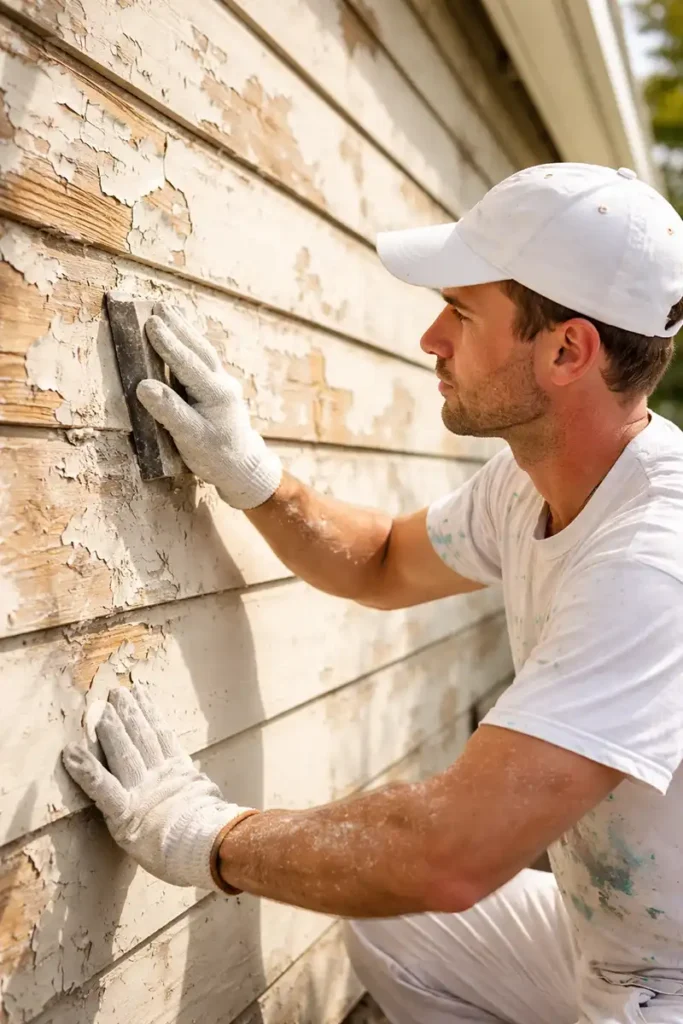
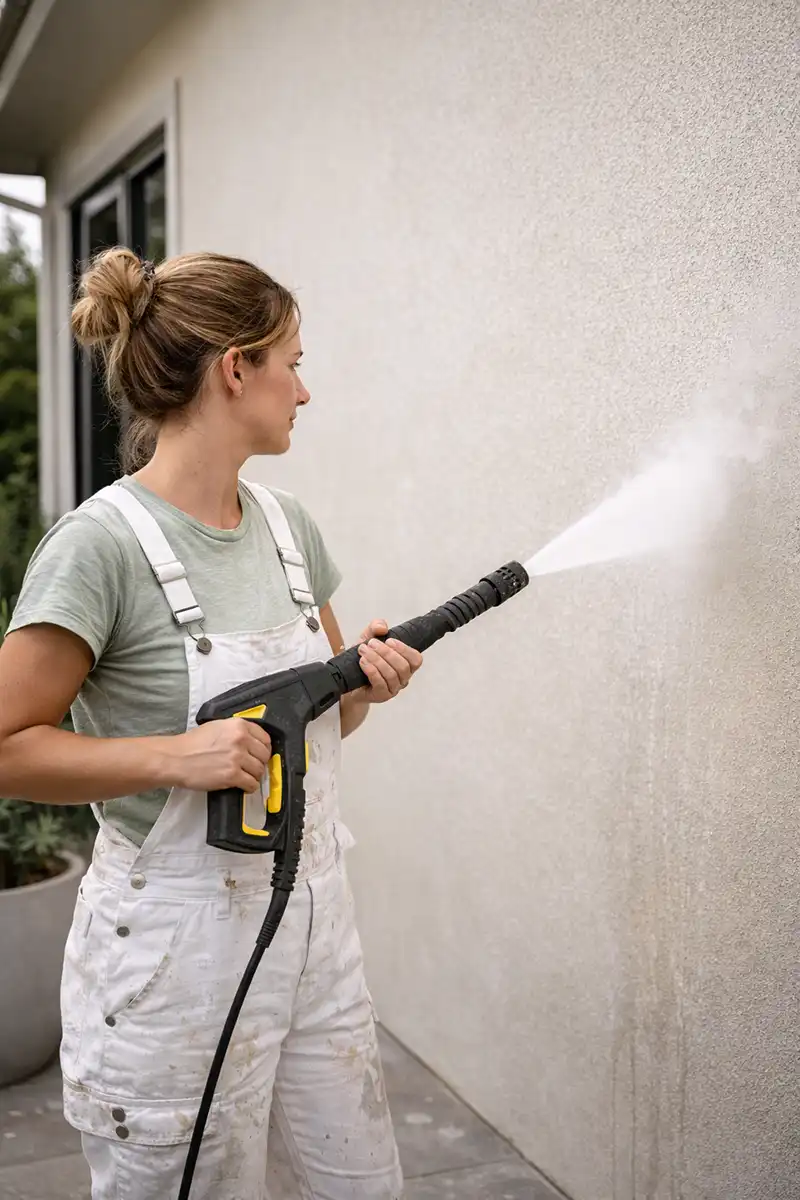
Summer Exterior Painting in Australia: UV, Heat, Humidity and How to Specify the Right System

Australian summer is hard on exterior coatings. Strong ultraviolet exposure, ...

right arrow
News 05/12/2025
Disposal & Wash-Up: What to Do with Leftover Paint in Australia

Leftover paint is a fact of life. The good news: ...

right arrow
News 25/11/2025
Deck Season: Oil vs Acrylic vs Water-Based — What Actually Lasts?

Australia’s decks cop it all: roasting UV, summer storms, ...

right arrow
;

We are here for you, ask us anything

Leave your enquiry and details below, and we’ll get back to you as soon as possible.